Intro to macros — one-click letterhead
“Measure twice, cut once.” – the organized world.
That’s some real handy advice. Advice that I have ignored for most of my life. I prefer, “move fast and break things.” But every now and then – when the wind is right and the moon is in the appropriate phase – the job has to be done right the first time. And in that case, it’s better to take your time. Apparently, it’s better to measure twice.
But what if we need to cut more than once — like a lot more than once? What if we need to make the same cut hundreds of times? Now, move fast and break things starts to sound a lot better, doesn’t it? Well, if we still can’t afford to break and fix things, over and over, then we need to do a little pre-planning. We need to make a jig.
A jig is essentially a way of storing an action for later use. When we make a jig, we measure a third item twice. Make sure it’s perfect. And then cut a lot of things once. All with the knowledge that if that third item is correct, then our cuts are correct. So, we’ve automated the measure twice part. We’ve packed the action into a tool that we can use over and over. And although it may have taken us some time to make the jig, each time we use it, it pays us back.
Obviously in our offices, we aren’t literally cutting things on a day-to-day basis. What we need is an electronic jig. Something that can automate tasks that we do on our computers. Because we’ve got a lot of tasks that could use a little automation: sorting email, placing letterhead into a document, finding and replacing party names in pre-made forms, and contacting clients about upcoming hearings, to name a few. We just need to determine which ones are worth the time it takes to make the jig on the front end, and then what kind of jig to use (in this case, we will use a Word Macro).
For this initial tutorial, I’ve chosen a relatively easy-to-automate task that I know many of us have to do multiple times on a daily basis:
Placing letterhead into a document.
So I’m gonna walk you through creating a Macro in Microsoft Word that’ll run a program to place your letterhead in to your document so that you can write on top of it. And although we’ll be messing around with a little bit of code, all you’ll really have to do is cut-and-paste — so it shouldn’t be too tough. I’ve placed the main instructions at the bottom of the document (so you can skip ahead if you like), but before I get into them, I’ll briefly explain a few concepts that you may want to know more about – like, what is a Macro?
What is a Macro in Microsoft Word?
Macros are a computer science and programming concept related to automating tasks so programmers don’t have to rewrite code over and over again.
But we don’t really need to know that. We can keep ourselves within the Microsoft Word universe for now. And in that universe, a Macro is a small program that can do one or multiple tasks in a Word document at the click of a button. You can program them to do pretty much anything that a user can do in a Word document. In fact, they can be programmed to be used as malware if someone were so inclined (read about that here) – which is why you should be careful what documents you open from your email. They are written in Microsoft’s proprietary code called Visual Basic for Applications (VBA). But there are other ways of creating Macros beyond simply writing the code into the VBA editor.
The easiest way to create a Macro is simply to record the actions that you’re taking, save them, and then play those actions back by clicking a pre-set button. You can do that by:
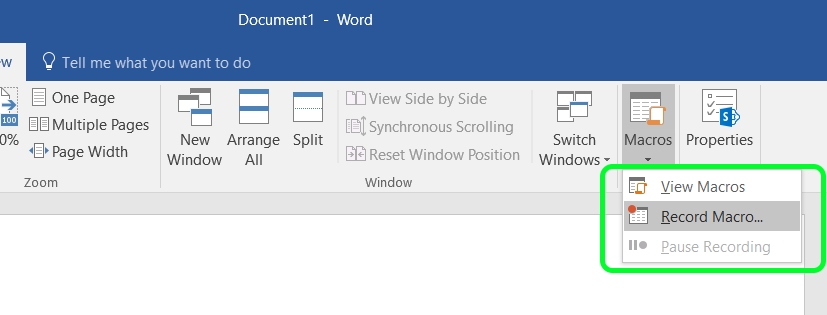
- Navigate to the
Viewtab and click on the drop-down menu forMacros. - Select
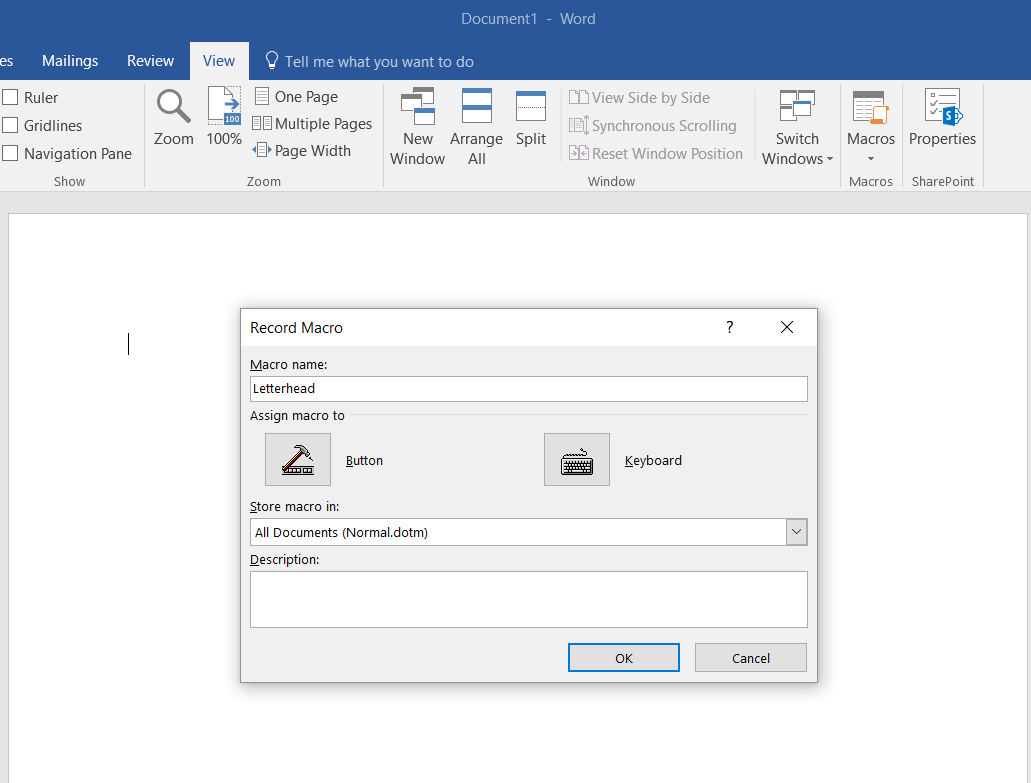
Record Macro... - In the pop-up menu, you can name your Macro, and select whether it will be stored locally (in this document only), or globally (in all of the current user’s documents), and whether it will be called using a button, or a keyboard short-cut.
- Once you’ve started recording, the actions that you take will be noted in the Macro until you choose to
Stopyour recording in theRecord Macrodrop-down menu again.

This method is reasonably easy to use for simple tasks, but you need to be careful. It will not always record some of the more intricate actions that you are taking, so you’ll want to test your Macro as you go along.
Creating a Letterhead Macro in the VBA editor
The second way to create a macro, and the most versatile way, is to write the VBA code directly into the editor. This is the method that we’ll use for this tutorial.
Before we get started you’re gonna need to prepare the image of your letterhead that we’re placing in the file:
- It needs to be the size of the entire page, so we can write directly over it.
- It needs to be in
.tiffformat (or another image file type that can be imported into Word – which, for those of you wondering, is not.pdf.) There are many free filetype converters out there, just be careful what you click on. Or you may be able to ask your letterhead designer to provide you with the proper format of the image. - It needs to be saved in a permanent location on your computer. If you change the location of the file, you will need to update your Macro, or it won’t know where to find it when you try to use it later.
- And, finally, you need to know the path that your computer is taking to get to that file. Which can usually just be copied from the address bar in the window that your file is located in. Mine is:
C:\Users\Zack_\Documents\Tutorials\Macros\Letterhead.tiff
Make the Macro
- Navigate to the
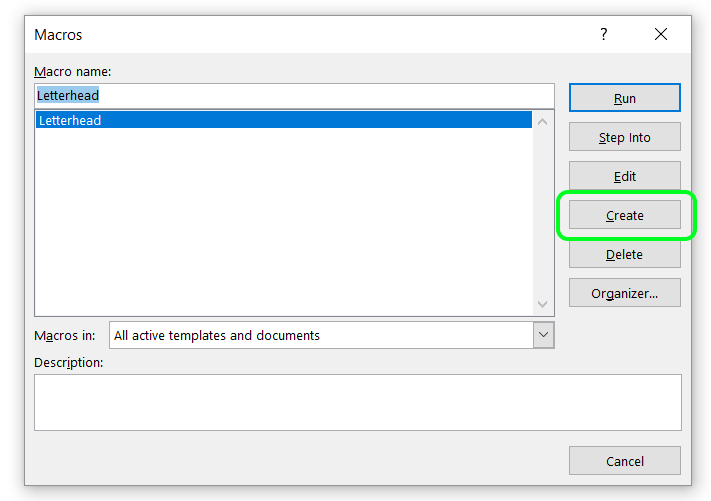
Viewtab and click theMacrosbutton. - A window will open up showing you your existing Macros. In mine, I already have a Letterhead Macro, but you will want to create a new one.
- Name your Macro and select
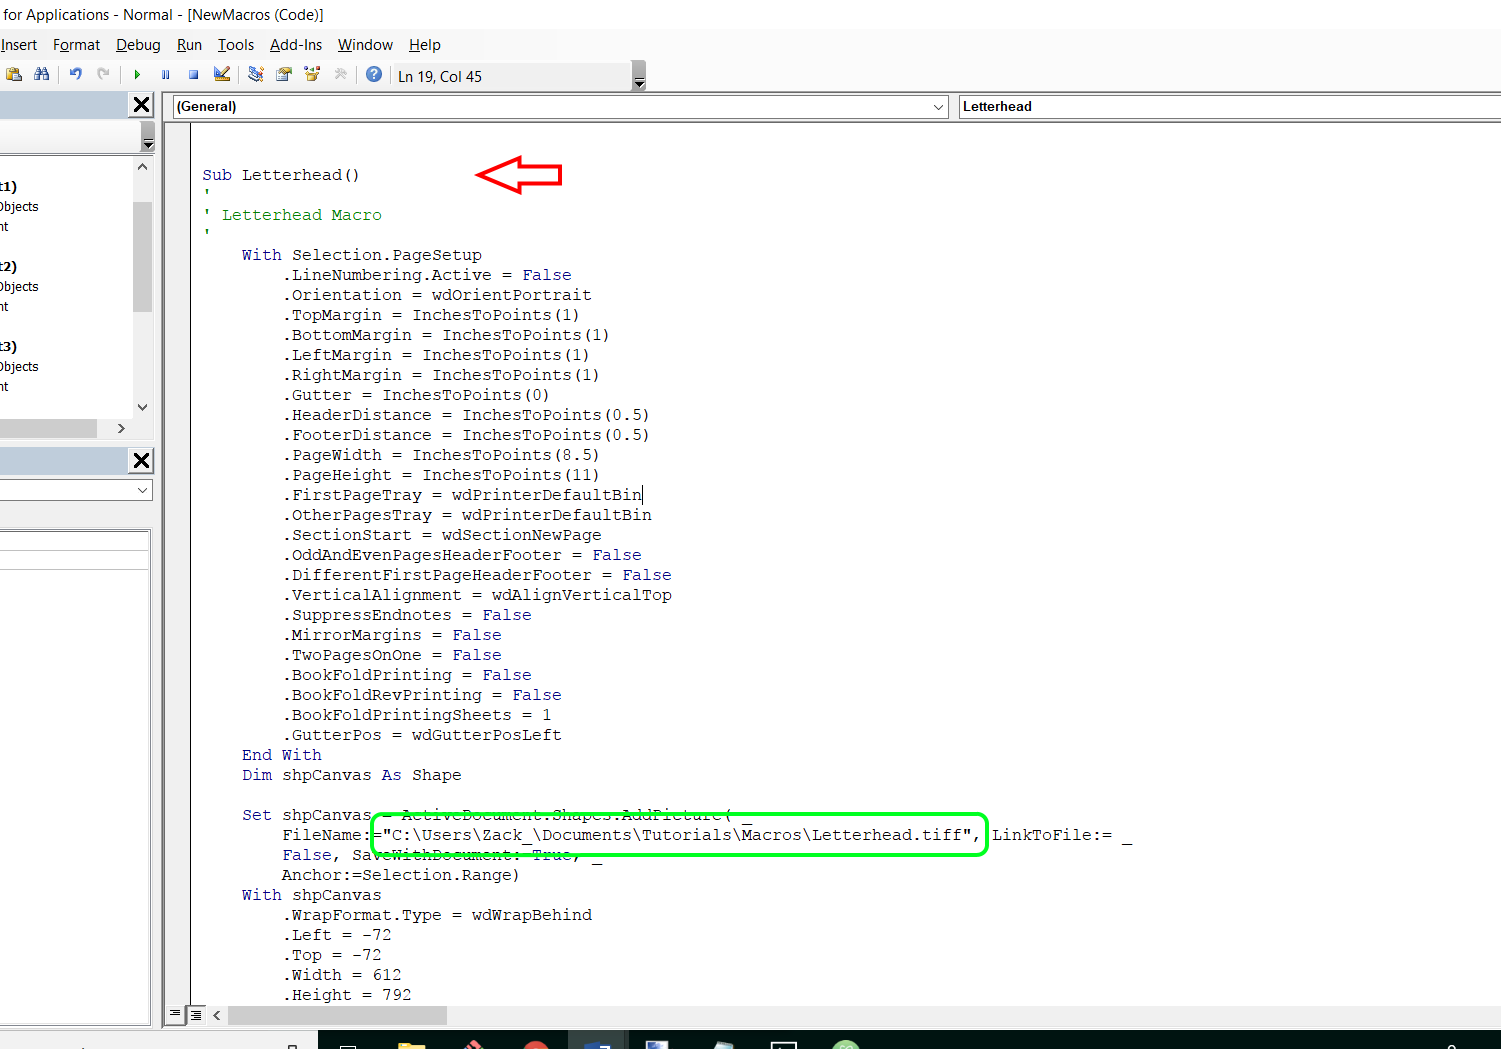
Create - Now, the VBA editor will pop-up and you can edit your Macro directly. Just copy the code that I have provided below into the editor and save the Macro. But replace my file path with the path to your particular file. Its the portion just after Filename, between the quotes.
- Your code should generally look like the image below
- Once your code is pasted into the VBA editor and saved, we need to attach that Macro to a Quick-access toolbar button.
Sub Letterhead()
'
' Letterhead Macro
' Sets the margins to 1 inch all around
    With Selection.PageSetup
        .LineNumbering.Active = False
        .Orientation = wdOrientPortrait
        .TopMargin = InchesToPoints(1)
        .BottomMargin = InchesToPoints(1)
        .LeftMargin = InchesToPoints(1)
        .RightMargin = InchesToPoints(1)
        .Gutter = InchesToPoints(0)
        .HeaderDistance = InchesToPoints(0.5)
        .FooterDistance = InchesToPoints(0.5)
        .PageWidth = InchesToPoints(8.5)
        .PageHeight = InchesToPoints(11)
        .FirstPageTray = wdPrinterDefaultBin
        .OtherPagesTray = wdPrinterDefaultBin
        .SectionStart = wdSectionNewPage
        .OddAndEvenPagesHeaderFooter = False
        .DifferentFirstPageHeaderFooter = False
        .VerticalAlignment = wdAlignVerticalTop
        .SuppressEndnotes = False
        .MirrorMargins = False
        .TwoPagesOnOne = False
        .BookFoldPrinting = False
        .BookFoldRevPrinting = False
        .BookFoldPrintingSheets = 1
        .GutterPos = wdGutterPosLeft
    End With

' Places the image in the document with a negative margin to account for document margin
    Dim shpCanvas As Shape

    Set shpCanvas = ActiveDocument.Shapes.AddPicture( _
        FileName:="C:\Users\Zack_\Documents\Tutorials\Macros\Letterhead.tiff", LinkToFile:= _
        False, SaveWithDocument:=True, _
        Anchor:=Selection.Range)
    With shpCanvas
        .WrapFormat.Type = wdWrapBehind
        .Left = -72
        .Top = -72
        .Width = 612
        .Height = 792
    End With
End Sub
Make the Button

More Commands option from the drop-down menu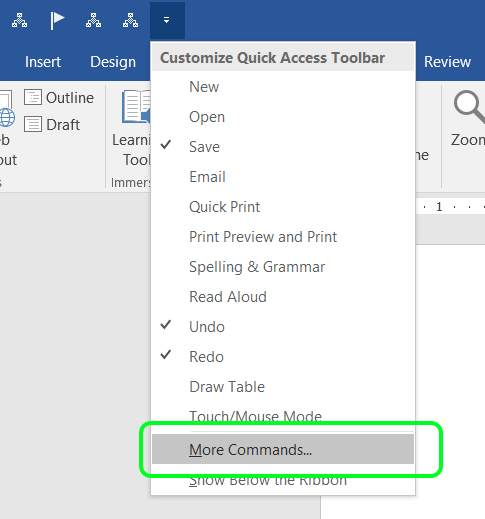
Macros from the drop-down menu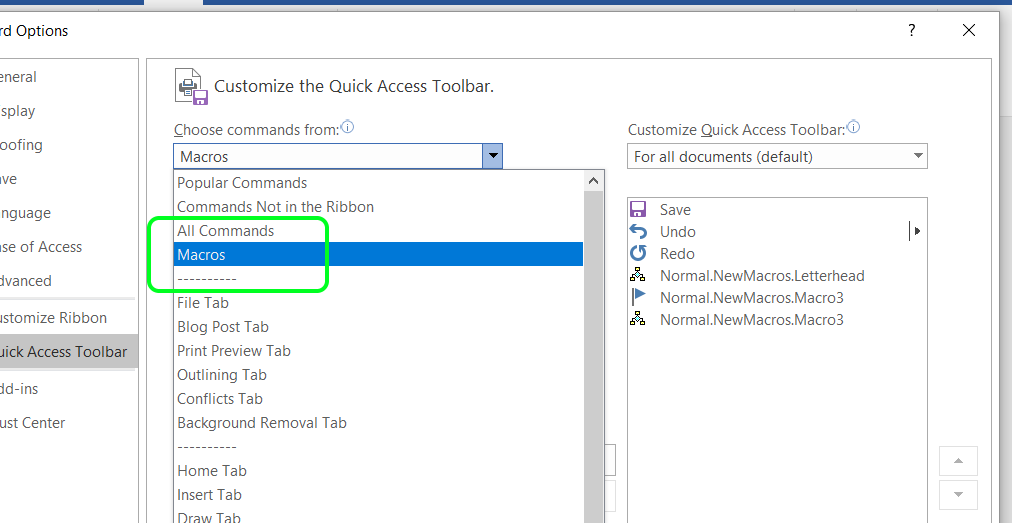
Add button to move it to the Quick-access toolbar area.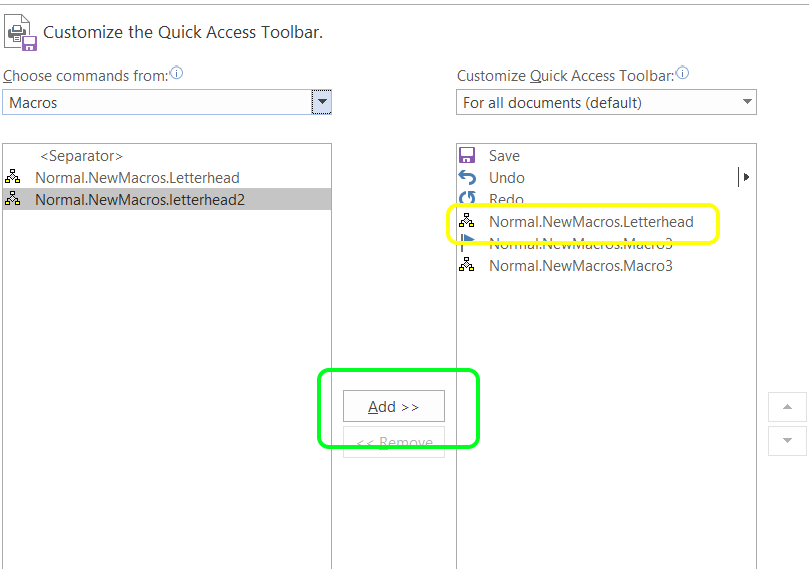
Modify.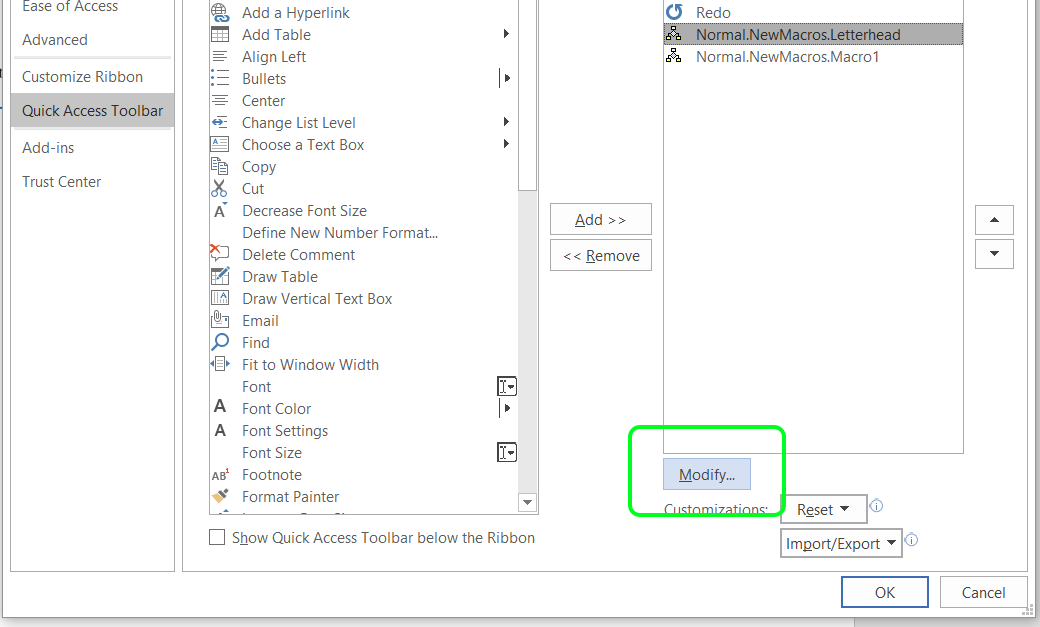
OK, and it will take you back to the original pop-up menu.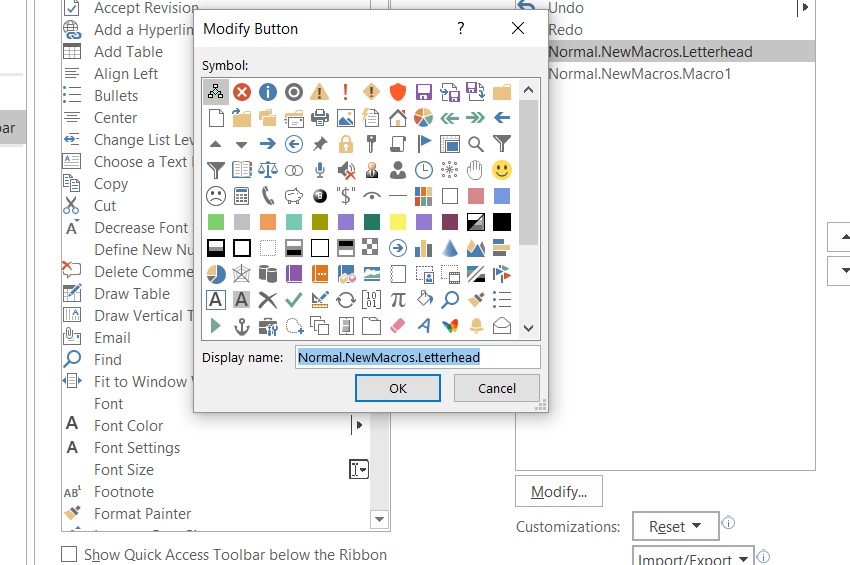
OK to save the button, and you’re done.Conclusion
As you can probably tell, Macros can do more than just one-click letterhead. They can be used to automate many of our repetitive tasks. It just takes a little effort on the front end, and sometimes a little creativity. In the future, when you start to find recurring tasks, maybe you should look into creating a Macro for that (I’m looking at you “Inserting Certificate of Service”). But this is just the tip of the iceberg.
There are many other “jigs” we can create. Between conditional formatting, Excel spreadsheets, and Access databases, most repeatable Microsoft Word tasks can be automated – you just have to take trhe time to set them up.
For those of you who want to expand your VBA skills, and explore the power of Macros, I have provided a few links for further reading below. If you start to get overwhelmed in these documentation sites, just start at the beginning. Microsoft has some very good “Getting Started” pages. You can also just search the internet to see if someone has already created the macro that you want to use, then you can tweak it for your purposes.
Either way, good luck. I hope you continue to get more efficient in your practice.